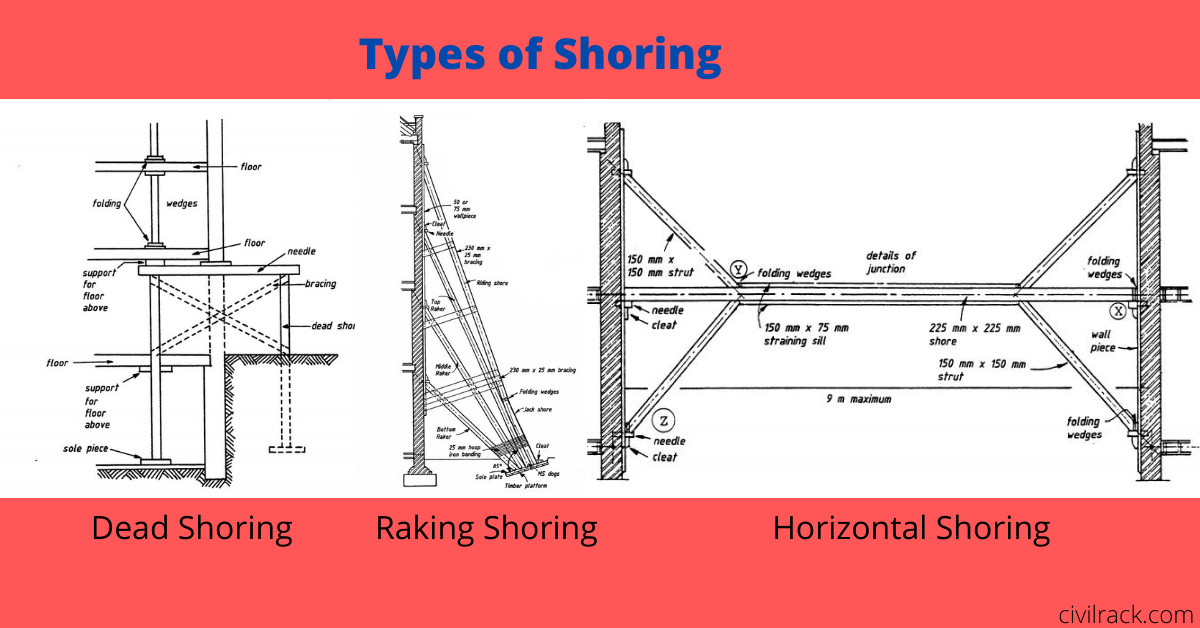
During the demolition or construction of a structure sometimes we need to provide temporary support to the structure, which is known as shoring. There are three different types of shoring, dead shoring, raking shoring, and flying or horizontal shoring.
What is Shoring?
A Shoring provides temporary support to a structure until it is stabilized by permanent structural work. It should be done whenever there is a possibility of collapse, capsizing, or drowning. The settling of the foundation may be caused by earthquakes, adjacent excavations, lower groundwater levels, etc.
The Shoring prevents further sinking and resists any tendency of the building to tip over. Demolishing a wall or part of it to replace it with beams requires support for the floor, ceiling, and the rest of the wall to avoid collapsing. The main job of the Shoring is to support its weight, although it is also wise to anchor the wall sideways.
Application:
Shoring can be applied to some of these situations.
- Provide support for dangerous walls that may become unstable due to settlement, bulge, or tilt.
- To avoid acoustic wall failure caused by the removal of the pillar below.
- During the demolition process, provide support for nearby buildings or structures.
- Support the top of the wall while forming a large opening at the bottom of the wall.
- Provide support for the floor or ceiling to remove and replace the supporting wall with beams.
Types of Shoring
There are three types of shoring
- Dead Shoring
- Raking Shoring
- Horizontal Shoring
Dead Shoring:
These types of Shoring are used to support static loads running vertically down. Its simplest form consists of a vertical shore or support leg with an upper plate, lower plate, and some adjustment devices to tighten and loosen the support.
In the case of steel beams, floors, or roofs, the bank can be constructed directly beneath the chemicals and supported directly on the component’s underside. To move the load, you have to push it out of the center of gravity, which is why the wall or column does not work so easily.
A standard method is to pass a horizontal beam (called a needle) through a prepared hole in the wall. Into the wall, needles are anchored with vertical support. At the same time, the column is supported by a needle anchoring in the column. Otherwise, the collar may be attached or anchored to the column by inclined support.

Critical Points For Dead:
Here are some critical points to remember during the installation of dead Shoring.
- The bottom plate must be used under vertical support.
- All parts must be firmly supported in both directions to prevent any lateral movement. The joints between components shall be firmly fixed by dogs, fish plates, welding, etc.
- First, cut through the holes at intervals not exceeding 1800 mm and intervals over the permanent beam’s end position.
- In a wall with a window, the needle should be placed under the sidewalk. Moreover, the window must be firmly supported to resist deformation.
- After placing the needle, vertical support will be erected directly below it and placed on the folding wedge on the bottom plate.
Dead Installation procedure:
The construction procedures for a successfully dead shoring are as follows:
1. Conduct a thorough on-site investigation to determine:
- The number of shores required by choosing the potential loads and window positions.
- The bearing capacity of the soil.
- Underground service locations that must be avoided or blocked.
2. Install the ceiling support between the appropriate upper and lower panels to reduce the floor and ceiling load on the wall. The position of the column should be as close as possible to the wall.
3. Support all window openings near the shore to prevent the openings from moving or deforming. The usual method is to lay wood planks on exposed wood chips and support them between them. It may be necessary to remove the window frame to provide a suitable support surface for the panel in some cases.
4. Cut a hole slightly larger than the needle in the wall.
5. Make holes in the ceiling and the bank on the ground.
6. Anchor the sleeper on level ground and remove the paving if necessary.
7. Pitch, wedge, and fix the shoring system.
Read Also: Formwork (Shuttering)! Components and types of formwork
Raking:
These types of Shoring transfers the floor and walls’ load to the ground through diagonal rakes or supports. It is essential to place the rakes correctly to withstand the largest wall and floor loads. The centerline of the rakes should intersect the central line of the wall or floor.
On each floor, the rake needs an ideal angle to the horizontal should be between 40 ° and 70 °. Therefore, the number of struts that can be used is usually limited to three. If there are additional members (they are called a rider), then a four-story building can be supported in this way.
When the upper shore is supported on a short “shore,” riding raking tilts the shore to reduce a single component’s overall length or have structured acoustic support.
A Wallplate is used to distribute the raker’s head pressure on the wall. The wall piece is 50-75 mm thick, about 75 mm wider than the shovel, and is held in place by low carbon steel wall hooks. The needle also provides a seat for the range hood and prevents the wall panel from moving.
But due to the shear forces involved, it must be cut precisely so that it passes through the bore in the wall and into a one-way hole of 110 x 110 mm in brickwork. The sheer force between the needle and the wall member’s outer surface is resisted by the anti-slip plate approximately 100 x 75.
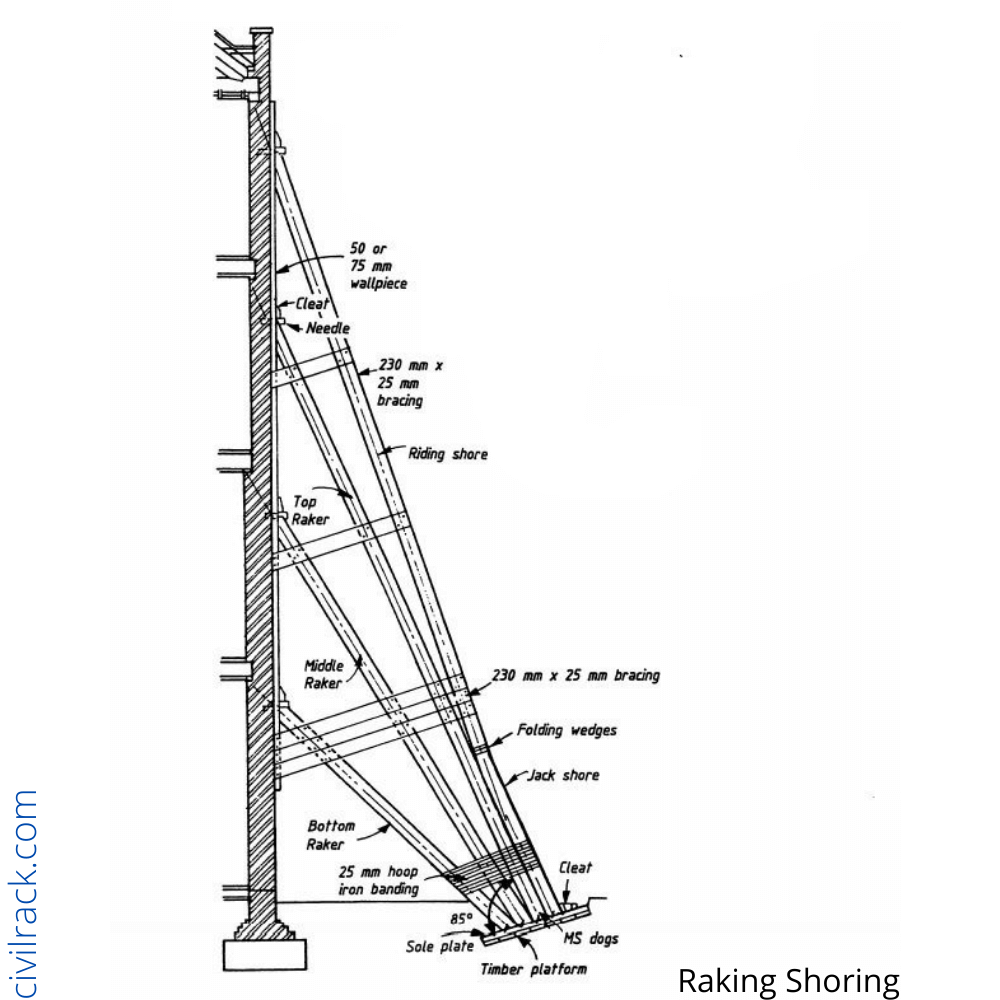
Critical Points For Ranking:
- The raker should tilt 45 ° to 75 ° relative to the ground, but 45 ° is more effective. The angle of inclination of the top of the rake should not exceed 75 degrees.
- For tall buildings, the rake length can be reduced by inserting rider rakes.
- The rake must be fixed regularly.
- The size of the rake should be determined according to the expected orientation of the wall.
- Keep the centerline of the rakes and the wall at the same height as the floor.
- If necessary to support a long wall, the posts’ span should be 3 to 4.5 meters according to the requirements.
- The bottom (sole) plate must be properly pitched and anchored to the ground. It must be properly anchored. The base plate should be wide enough to support all the suction rods with ease and provide cleats along the outer edge.
- Wedges should not be used on the sole, as the wedge may be generated under the influence of potential vibration.
The installation procedure of Ranking:
- Conduct an on-site investigation as described in dead Shoring.
- Mark and cut the cavity and shell on the wall panel.
- Cut and cut holes on the outside wall.
- Dig into the hard subsoil and lay the net platform and bottom plate.
- Start cutting and prepare your shovel from the bottom bank. A notch is engraved on the heel so that crowbar can be used to take the rake out into the bottom plate for a beach haul. The angle between the base plate and the strut should be approximately 89 degrees.
- Fix the anti-slip bolts, specified blocks, and fasteners; if necessary, crisscross them on the back of the shore.
Flying Shoring (Horizontal):
These types of Shoring have the same functions as raking shoring but have the advantage of providing a clear working space under the support. If the span does not exceed 12 meters, then it can be used between any parallel walls. Otherwise, the arrangement will become uneconomic.
Short spans with the longest span of 9 meters typically have only one horizontal member. In contrast, larger spans require two horizontal supports to maintain the section size within commercial lumber. It is an approximate shape of the plywood structure.
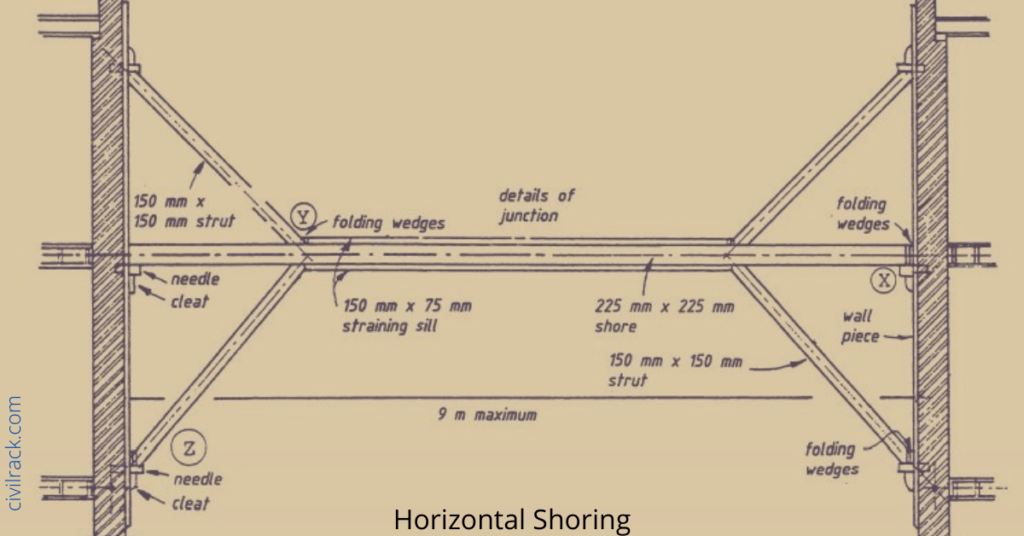
Critical Points For Flying Types of Shoring:
- The central lines of the flying Shoring, the pillars, and the walls’ central lines must intersect the two buildings’ floor. If the floor height is different, the horizontal strut must be placed in the middle of two equal heights of strength or placed at a weak ground height.
- The best inclination of the support rod is at 45 degrees. The slope should not exceed 60 degrees.
- The span, which is 9 meters long, the single shore can be used only between the two walls. To obtain greater distances, double shores should be provided. In this case, both horizontal shores should be located symmetrically to the ground.
- The distance between the two walls of the flying shores should be between 3 and 4.5 meters. Horizontal supports should be used between adjacent shores.
- In this system, each support member is determined using a greater safety factor since it is not uncommon to evaluate the actual load.
- If there is a structural gap between two buildings due to the old building’s demolition, the flying shore shall be inserted and removed after constructing the new structure Shoring.

